In order to produce an accurate landscape design, you require a base plan taken from accurate measurements. It is important to follow a routine when doing this.
Step 1 – Map the locations of building(s) first
Get the footprint of the house down first as large as possible on a sheet of graphed paper on your clipboard. Start at a corner of the building. Do not worry about drawing to scale; this is a mud map drawing. You are simply recording accurate measurements of walls and windows. These values will later be used when constructing an accurate base map.
Tip: The only reason to use graphed paper is to help you draw straight lines. Remember, it is still a sketch. The dimension labels are the most important
The figure below shows a typical map of a building. Distances are best recorded in decimal feet when working in the Imperial system (USA) and in mm when working in a metric environment. Note that the building footprint takes up most of the sheet, but enough room is used to record distance measurements.

Tip: Some designers put the length of windows on the inside of the footprint and the length of the walls on the outside.
Don’t forget to locate the downpipes attached to the house and their discharge point. This can be important when designing constructed ‘mini’ wetlands.
Step 2: Locate the side boundaries and the house
Next, make a second mud map of the building about the site, but draw it much smaller (and without dimensions)—place it in the centre of a second sheet.
Triangulation
Using your long tape, measure from the corners of the house to the boundary corners. We use two known points (on the corners of the house) and measure to the unknown point (the corner of the boundary). This process is known as triangulation and can be applied to the location of any significant trees on the site.
Tip: Make sure that you take enough measurements (triangles). It does not matter if you exceed the number required to locate the boundary properly. You do not want to have to make a return visit to pick up a measurement that you forgot to take!

Some designers make the corners of houses A, B, C, and D and make small tables listing lengths A to the corner, B to the corner, etc. Trees might be labelled E, F, G, H, I, J, etc., and distances to them are incorporated into a table.

Remember to locate significant trees on the site and ensure that services such as water, gas, and telecommunication lines are located accurately.
Based on these two drawings and measurements, you can produce an accurately scaled drawing of the site and its buildings back at your home base.
Tip: If the site has a significant fall, is extra-large, or contains many buildings, it may be worth discussing with your client the need to have a proper survey prepared.
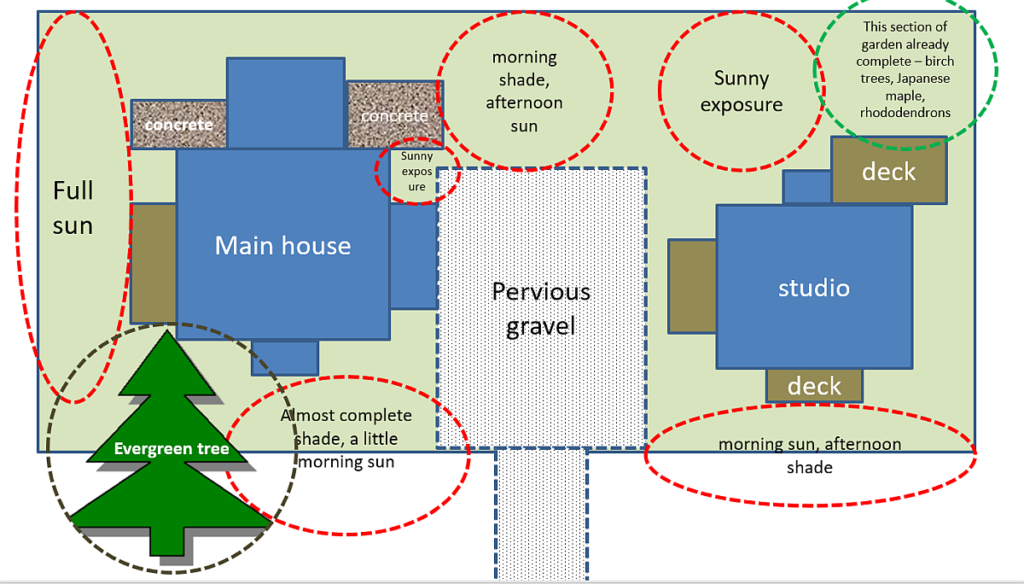
Step 3: Locate the direction of north
Use your compass or phone to locate the direction of the North point. Mark the direction of the North to the building with an arrow. Double-check that the arrow you have drawn indicates north correctly, as you need to know which areas of the site will be in shade and sun. This will directly influence your planting plans.
Our next step is to turn this site data into a proper (and accurate) base plan. While conventional hand drafting techniques can be used for this task, we will use CAD software.
Tip: For successful hand drafting, you will need a comprehensive set of tools—a drawing table, set square, angular drafting tool, compasses, drafting pens, cleaning equipment, erasers, etc. These can cost a surprising amount of money. The CAD software we will use to do the same job and more costs less money!
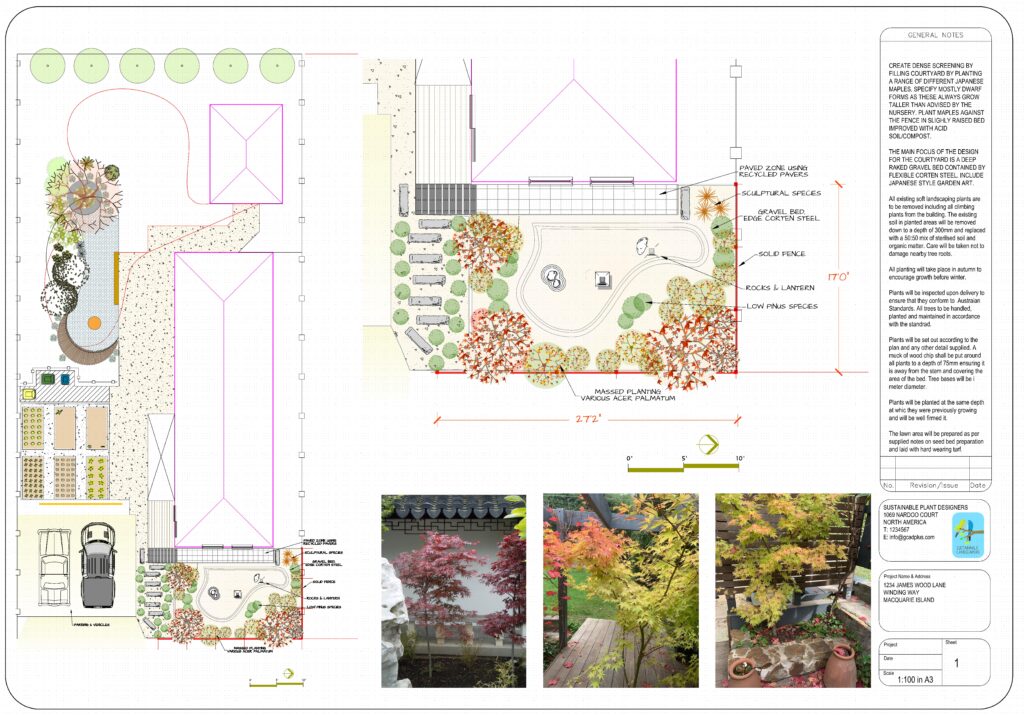
The next step is to generate a concept plan for the site’s development.
Then, it is on to produce a landscape plan. Here is a design for a house in Port Townsend, Washington State, USA.